12.30.2014

DIY // Bobby Pin Mini Crown

 For the last few years, I've been making my own new year's eve party hat. I've done a tinsel halo  and a colorful pipe cleaner and pom pom crown recently. Over the weekend I made a mini crown to wear while ringing in the new year and thought it turned out really so I just had to share with you all. I'm actually pretty glad that I at least have this done because I have no idea what I'm wearing for New Year's Eve...something sparkly for sure.
 Supplies: Glitter Scrapbook Paper (mine is about 7 inches long), Gold Foil Tissue (2 strips), Glue Gun, Scissors, Foam Board, Bobby Pin
 1. Cut fringe into the foil tissue paper.
2. Hot glue both strips to the bottom of the glitter scrapbook paper.
3. Form the scrapbook paper into a circle and glue the ends together.
4. Cut triangles into the top of the paper to create the crown.
5. Take a bobby pin and place it between a piece of foam board. Make sure that the foam board is long enough to go from side to side of the crown.
6. Hot glue the foam board with the bobby pin to the inside of the crown.
All done! Isn't everything more cute in mini form? Let me know if you try this out #sobdlife
xoxo erica

12.22.2014

A Sweet Idea // Chocolate Kiss Thumbprint Cookies

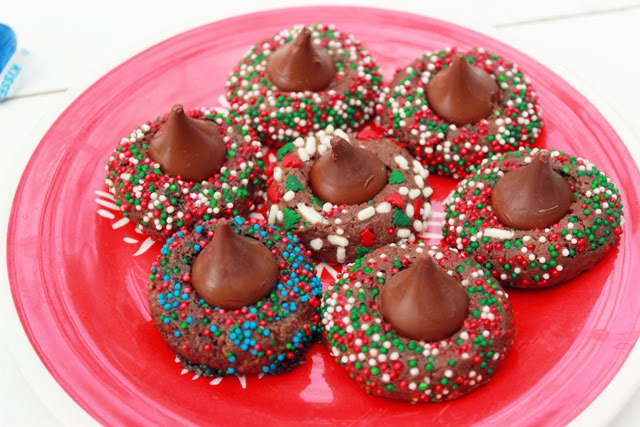
 Over  the weekend my cousin hosted her annual christmas cookie exchange party. This is always fun for me because I try to make a cookie that I haven't made before, so instead of going with my usual chocolate chip, I tried a thumbprint cookie. I followed this recipe and it worked out great. I love that you can use a variety of sprinkles to make them look festive...oh and not to mention that they were delicious! I had to keep myself from eating them all on my own. 
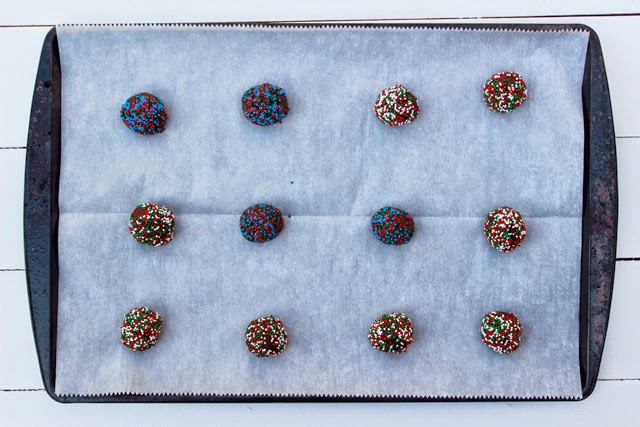
 1. After you make the dough, roll into a ball and roll into sprinkles.
2. Place on parchment paper and make a thumbprint into the cookie.
3. Bake in the oven at 375 for about 7 minutes.
4. After they come out of the oven, immediately place a chocolate kiss in them.
I thought it helped to unwrap the kisses just before getting the cookies out of the oven.
5. Transfer cookies to a wire rack or plate and let them cool off.
I found that with them just sitting out to cool off, the kisses were still really warm and would easily melt even after a good 30 minutes. Since I was baking these before the exchange, it worked out better for me to place them in the freezer for about three minutes so that I could stack and take them with me
yum! Enjoy! Do you have a favorite cookie you always bake for Christmas?
xoxo erica

12.19.2014

Four Years

I happen to think that some of the best days are the days when you wear a bit of sparkle. I can't believe that today is my blogiversary! so it was only right that today would be celebrated in some sparkly sequins...my favorite! Blogging definitely isn't easy but I've enjoyed coming here the past few years and I only want to thank you for coming by and giving me someone to share this little journey with. I've learned a lot from blogging, met some pretty cool people because of it, and discovered a whole new passion for being creative and sharing that with you all. So thank you! thank you! thank you! Seriously I really can't say that enough. I appreciate everyone who stops by my little space here, leaves a comment, or sends a sweet email. You truly are the best! 
Here's to another year!
xoxo erica

12.12.2014

Velvet and Lace

 The other day, I pulled out this skirt to do some Christmas shopping. The velvet has always made me think of winter and although it's not cold out yet, it was perfect for grabbing some hot chocolate and really making a dent in my holiday shopping list. Me and chris found some great deals and nearly knocked out all the gifts for my side of the family! Saying I'm excited about that is an understatement because I have a large family and this weekend we are just picking up stocking stuffers and a few small gifts. Have you already finished your holiday shopping? 
Oh and I've been having some major problems with the wifi out here...hence the lack of posting. I'm thinking my Saturday mornings and Starbucks are going to be best friends so I can get things done for the blog. Hope you all have a wonderful weekend.
xoxo erica

12.09.2014

Holiday Pinspiration

1 / 2 / 3 / 4 / 5 /
Has your December already started filling up with party dates for the Christmas season? I actually went to my first get together holiday dinner over the weekend and have two more this week! I love getting dressed up for parties this time of the year...just let me pile on the sequins and sparkly stuff and I'm a happy girl. Okay, so wearing sequin leggings is on the top of my list this holiday season...what's yours?

xo erica

12.03.2014

Hearts & Sequins

 I love online shopping but y'all I just took this to a whole different level and bought this dress on instagram! One of the bloggers I follow just happened to say that she was selling some of her clothes and I spotted this heart dress in her photo collage. I was the happiest when I saw that the dress was actually my size and nobody had claimed it...my lucky day! I knew I had to have it and bought it immediately. Have you ever bought anything off instagram? Any amazing purchase? Do tell!
xoxo erica

12.01.2014

DIY // Christmas Bow Pom Pom Garland

Have you already started decorating for Christmas? I won't lie, I kinda started before Thanksgiving!! Don't judge me! Any how, I wanted to share a quick and super easy holiday garland for you to spruce up your space with. What's not to love about shiny and festive bows strung up around your place? 
Supplies: Christmas bows ( I used mini's but large ones would be fine), Scotch Tape, String, Scissors
1. Snip off pieces of the bow backing so it doesn't hang over the actual bow.
2. Tape the bow to the string.
3. Take another bow of the same color and peel off the paper so the back is sticky.
4. Attach the bow to the bow taped to the string.
Keep repeating for all of your bows!
Hope this makes your space a little more merry!
let me know if you try this...tag your pic #sobdlife

On another note...does anyone do project life? I've been wanting to get into but was never sure if I could keep up with it. I saw a pin board title the other day called December Daily and I'm not sure if it's a "thing" but I figured I would give photographing daily and scrapbooking it this month. I'll be tagging my pics with #sobddecemberdaily if you want to do it along with me :)

xoxo erica

11.25.2014

Nail Tutorial // Two Toned Holiday Nails

 Hey everyone, are you all excited about the upcoming holidays as much as I am? Everything I do pretty much involves sequins, glitter, or any kind of sparkle these days. I recently tried a marble nail that was a total fail but one of my nails had this pretty split of color that inspired this design. And like I said, sparkles are pretty much swirling in my mind so yeah a thin strip of glitter makes the loveliest festive nail to pair with a full on sequin dress or even a casual jeans and tee.
 1. Paint your nails in a fun bright red base color.
2. Place a piece of scotch tape down the middle of your finger. I alternated sides.
3. Paint your nail in a cute ballerina pink.
4. Once dry, peel off tape carefully. Don't worry if the lines are a little messed up, they will be covered.
5. Using a thin brush, dip into a clear polish and draw a line down the middle.
6. Dip your nail into some extra fine glitter. I poured a bit of glitter into the glitter bottle cap.
7. Blow off excess glitter.
8. Top coat your nails. I top coated each section, the light pink and red on all nails first before going over the glitter on any nails to avoid getting glitter where it shouldn't be. 
All done!
Let me know if you try this on insta by tagging your pic #sobdlife  I would love to see if you try any other color combos!
xoxo erica

11.24.2014

Life Lately


1. I've officially caught the Christmas fever! I usually don't like anything Christmas-y until after Thanksgiving, so I don't know what has gotten into me this year. I couldn't help but buy these reindeer glasses from Target the other day...aren't they the cutest?!
2. This photo was literally taken seconds before my sister's cat Theodore attacked my dress.
3. Chris and I taking selfies at Fashion Houston before the show started.
4. I've been painting a lot lately. A top knot kind of day was me over the weekend. I've been thinking of opening an etsy print shop so stay tuned on that!
5. Sequin filled ornaments! Over the weekend Chris and I made a few diy ornaments to hang on the tree.
 6. I like to get creative when decorating cakes...chocolate chip heart for this one.
7. We went to see the Rebecca Minkoff show last week at Fashion Houston. She is one of my top favorite designers so it was really like a dream to see it.
8. These two guys make me the happiest!
9. Pretty flowers to keep me company in my room. Love the color!
10. Fishtailing it!

xoxo erica

11.18.2014

Gimmie What I Want // November Wish List


What's on your wish list this month?
xoxo erica

11.17.2014

A Month of Gifting // 3 Easy DIY Wrapping Paper Ideas

One of my favorite things about buying gifts is knowing that I'm going to be wrapping them. I'm one of those that really cares about the packaging just as much as the gift itself. I've already hunted down some super cute and pretty wrapping papers over the weekend...one has cats! I know, I know but I can't help myself. I have a huge family and I alway like to mix up store bought and home made wrapping. I think there's something nice about adding personal touches...even if they are going to be ripped to shreds lol. I decided to share 3 easy diy wrapping paper patterns with you that anybody can do...you don't need any serious skills for these so go and give it a try.
 I've only seen snow twice in my life.. And to be honest it was maybe like 1/2 an inch at that...I couldn't even make a snow angel :( but I did have a snowball fight with Chris and his brother and make a tiny snowman. A white Christmas has always sounded like a dream so that was my inspiration for this paper. To get a dreamy snowing wrapping paper, simply did a brush into white paint and flick the bristles with your finger.
 For a fun and quirky print draw some swirly frills with a black sharpie. Don't worry about being precise with it. I think the imperfection is what makes it cute.
I wanted to make a wrapping paper that had more a Christmas theme and settled on a forest of Christmas trees! All you have to do is make a set of small triangles going down at angle and a set of large triangles going down at angle. Repeat the pattern and once the paint is dry (I used watercolors and they dried really really fast), trace around with a black sharpie and add a line for a trunk. Too cute, right?
Embellish with cute bows and jingle bells! Let me know if you try these ideas out by tagging your photos #sobdlife
xoxo erica
Follow Sea of Blooming Dreams