Showing posts with label diy blog. Show all posts

12.04.2013

DIY//Ryan Gosling Ornament

 Today at work my job is having a Christmas tree lighting and they asked us to bring a special ornament. I always like to have a little fun with the holiday festivities at work so I thought this diy ornament would be a hit. I mean, come on, what's more Christmas than Ryan Gosling wrapped up in lights?? This diy would apply to any photo you have of you and your loved one or your pet...just have fun with it.
 Supplies: Scissors, brush, glitter, mod podge, ornament, photo (mine is just printed from the computer) via here
 Cut off corners to round out and fit to ornament
 Apply mod podge to detailed areas you want glittered.
 Sprinkle with glitter.
 Shake off excess glitter, let dry, and apply with mod podge all over.
 Once dried, apply more mod podge to edges and glitter. 
 Let dry and then apply mod podge again to seal everything in.
All done. Hang from tree!
Happy Holidays :)
xoxo erica

5.30.2013

DIY//Drawstring Bag

Lately my life has been spent working and then heading to the gym straight after. Preparing the night before by packing up all my workout clothes has really helped me stay on track that way in the morning I'm ready to go. I have tons of tote bags to throw my things in but non that are fun enough to really show off. I'm loving this ombre shimmer one I made, it's perfect to put all my gym clothes in or for a day at the beach. 
Supplies: Drawstring bag, Scissors, Fabric Glue, Ribbon Trim
1. Cut pieces of ribbon and measure spacing between each piece.
2. Apply fabric glue and stick in place.
3. Cut off excess trim to length of bag.
4. Ready to use...fill up with all of your favorite things!!
xoxo erica

5.22.2013

DIY//Stud Bobby Pins

With the spike heels I bought recently and the rock concerts I've been going to lately, I've been having that rocker girl mentality. I pulled out my studded cutoffs over the weekend and they reminded me how much fun I was having studding everything last year. I knew another diy involving studs was next up on my list. These are super easy to make...(which is always favorite in my book) and they make a big statement especially if you double up and wear both at the same time.
Supplies: Bobby Pins, Glue Gun, Felt, Studs
oh and just a tip...I'm always getting asked where I buy my studs. I actually go to the thrift store and buy a studded belt. I end up paying about $2 for the belt and get a ton of studs.
  1. Glue felt to bobby pin, my felt is the length of one stud and the width of three studs
2. Glue Studs onto felt
3. Ready to wear! 
xoxo erica

5.09.2013

DIY//Sequin Bikini Top

Last year when working retail I fell in love with a bikini that was in our store. It was neon green with silver sequins...only one problem. Yup, the price for it was enough to shatter my hopes of ever buying it and I never did. I knew it would be simple enough to recreate and what do you know, it really is. If you follow me on instagram, you probably already know that I've working on getting fit and eating healthy. My mind is set to get myself into an itty bitty bikin without wearing a cover up. The next time I go to the beach I'll be wearing this one for sure.
 Supplies: Bikini Top, Sequin Trim, Glue Gun**
*I used a glue gun just for a quick makeover. If you decide to use one too I would hand wash and hang dry*
*Using fabric glue would be better. I've used it before and it holds up really well*
*And of course sewing the trim on with a needle & thread would be best*
1. Cut your sequin trim. 
I used one 5 inch strip, two 4 inch strips, and two 3 inch strips for each side.
2. Glue or sew on.
Ready to Wear
xoxo erica

5.01.2013

DIY//Floral Sunnies

 The other day I found these sunglasses in an old purse of mine. I hadn't worn them in what felt like forever and wanted to give them a quick cute update. I've always liked the idea of being able to embellish to give something an instant makeover. Love the way these turned out!
 Supplies: Sunglasses, Glue Gun (or jewelry glue), cabochons...find some here
 1. Decide on an arrangement
2. Glue on
Ready to Wear!
xoxo erica

4.23.2013

DIY//Crop Tie Tee

 I had this old tee in my closet that had a hole in it. If you know me, I'm all about upcycling something that is old to give it new life to my wardrobe. I always find myself tying my button ups and with summer right around the corner, I thought this would be a cute way to still wear this tee as it starts to warm up. Oh and I can see it as cool cover up at the beach with a bikini bottom. Do you have any old tees in your closet that maybe you've been thinking of tossing? Well don't, try this out first!
 Supplies: Tee & Scissors
1. Cut up at an angle to the point where you want the hem of your crop tee to hit. Cut all the way across on the back of the shirt.
2. Cut a slit straight down the middle
&
Ready to wear
xoxo erica

4.17.2013

DIY//Metallic Leather Heart Earrings

Since cutting up the leather skirt I found at the thrift, my mind has been getting all crafty on me thinking of what I could use the fabric for. I have a few things in the works but I wanted to share this one first.  Over the weekend, I made these little heart earrings...cute, fast, and easy. Not really a heart kind of girl? Make these in any shape you want...triangle ones are next on my list.
 Supplies:
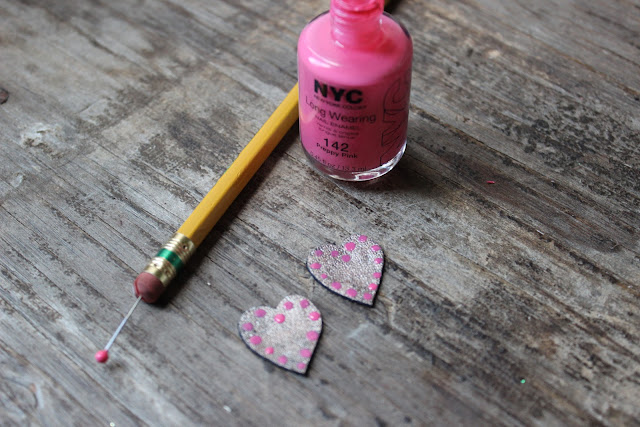
 Leather, earring posts, polish, pencil, scissors, pin, glue gun, & something to use as a stencil
 1. Paint leather with polish and let dry, apply second coat
2. Trace 2 hearts to back of leather (I used a locket as a stencil)
3. Cut out your hearts
4. Stick pin into the eraser of your pencil, dip the ball end into polish, and polka dot the edge 
(you can skip this step if you want metallic only)
5. Glue heart to earring post
&
 Ready to Wear
xoxo erica

4.10.2013

DIY//Floral Belt

Whenever spring comes around I feel like I want to incorporate florals all the time into my wardrobe. I thought this belt would be cute for wearing around during the warmer weather. Maybe even on a floral dress. 
Floral on floral...that would be fun.
 Supplies: Belt, Leather Flower Pieces, Scissors Glue Gun, Thread & Needle
(To make my floral pieces, I used leather from an old skirt I bought at the thrift store. I painted a small piece of the leather white, used a flower stencil and traced 5 pieces)
1. Thread a small cross in the center of your floral piece
2. Continue to thread through until you have a full center
3. Try on the belt and measure where you want the placement of the flowers to be, I stuck pins in the belt so that I would know the range of where I wanted mine to be.
4. Glue your floral pieces starting from the center out
5. Ready to Wear
xoxo erica

3.27.2013

DIY//Statement Headband

Hey, I'm back with another hair accessory.  I wanted to make something really spring-y and fun for the Easter holiday. Oh and I especially love that it's such a statement piece...plus this mix of colors just makes me happy. This project was really easy, you just have to be patient between each coat of polish. Much like the enamel bobby pins, the possibilities of color combinations are just endless. My heart is already racing just thinking of a pretty one in mint! 
 Supplies
Rhinestones, Headband, Nail Polish, & Glue Gun
1. Paint each rhinestone with color of choice.
 2. Let dry completely if wanting to add another coat
3. Start by adding glue to the center of the headband and attach rhinestone.
4. Repeat until you have your desired pattern
(add a thin strip of felt or cut into circles and add to back of 
rhinestone for extra support and a cleaner look)

vvv ready to wear vvv
I tried this on when I only had the pink and orange added to the headband and really liked it with just the two colors but decided to add the yellow in the end. So if you don't want to add as many rhinestones as I did, don't worry, it will still look great. Just have fun with it.

xoxo erica
Follow Sea of Blooming Dreams