Showing posts with label hair tutorial. Show all posts

11.05.2014

Hair Tutorial // Messy Fishtail Pony

It's officially feeling like sweater weather out here. The past few days have felt really nice with breezy afternoons and chilly nights. Last year I got really into scarves and can't wait to pull out some chunky knit ones soon. For some reason with a scarf, I find that I actually like wearing my hair up or pulled away from my face...cue in a messy fishtail pony, way better than your average pony.
 1. Pull hair into a high pony. When going for a messy look, I like to flip my hair over and pull it into a pony so that it doesn't look too neat.
2. Separate pony into two sections and start to braid your hair into a fishtail.
3. Once your pony is fully braided, pull at it to make it messy. You can even use a hairbrush to roughen it up. 
xoxo erica

9.18.2014

Hair Tutorial // Unicorn Braid Headband Tutorial

 When I first did a unicorn braid on myself years ago, I was obsessed. I saw a pretty fishtail hairstyle like this and thought it would be even more amazing with a unicorn braid. I'm loving it...and it's always a good hairstyle when you can have a braid and your hair down too. win win. Try this and be ready to amaze people...like for real. It's that pretty.
 Grab two pieces slightly behind the front of your hair.
Twist each piece counter clockwise. 
Once both are twisted, twist them together going clockwise.
 Repeat on other side and you have two small unicorn braids!
 Pull braid back and across and pin. Try to hide your pins by getting under the opposite braid or your hair. Repeat to the other braid and you're all done!
xoxo erica

8.29.2014

Hair Tutorial // Bubble Topsy Tail

 Every Thursday Chris and I play softball in a co-ed league with a team made up of his family and my brother. I really try to avoid wearing my hair in a pony tail because of my little baby hairs that fly up when my hair is pulled back. I usually wear my hair in a braid of some sorts and just pin back any loose hairs. Last week I tried out this hairstyle and really liked the look of it. The tightened topsy tail kind of reminds me of a fishtail braid but different, if that makes any sense? Anyway,  I thought I would share. It's quick and easy so give it a try this weekend.
 Pull hair to one side and loosely rubber band.
Place another rubber band about 2 inches down from first rubber band to create the first "bubble".
Start doing a topsy tail by splitting hair into two sections.
Pull hair through the hole. 
 Pull on hair to tighten your topsy tail.
Rubber band hair a little further down again and repeat steps.
 Keep going until you have a bunch of bubbles.
xoxo erica

8.14.2014

Hair Tutorial // Pancake Braid

I like this braid because if you know how to do a braid then you can do it. There's no crazy grabbing hair from another section or crossing your fingers all sorts of ways. No, this is simple. It works great with long hair..oh how I can't wait for my hair to get long again. Why does hair take so long to grow? Do you have secrets to growing hair faster? Please share...oh please do. Even if my hair isn't long and it's pretty thin, I really like the look of this fluffed out and flattened braid. Super easy, you need to give it a try.
1. Pull hair to one side.
2. Braid you hair. Don't rubber band it yet. 
3. Tug at the outsides of your braid to "fluff" it out with one hand while still holding the end of your braid with the other hand.
4. Your braid will shorten and should like mine in the picture above.
Rubber band it and you're all done.
xoxo erica
7.24.2014

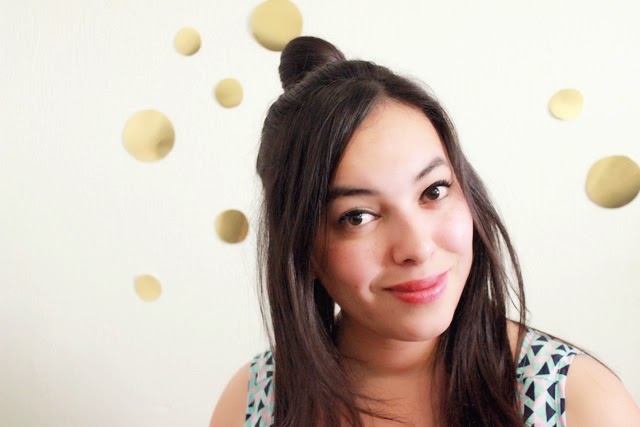
Hair Tutorial // Half Up Top Knot

One of my favorite instagramers has been rocking this half up top knot look lately. It looked so great on her that I decided I needed to give it a try. I haven't worn my hair in a half up half down look in forever but this hairstyle is definitely fun enough to keep wearing it again.
 1. Pull up section of hair that you want to top knot.
2. Twist your hair around your index finger forming a bun.
3. Rubber band over your bun.
All done...easy peasy :)
xoxo erica

5.12.2014

Hair Tutorial // Snake Braid

I'm not sure what it is about braids but I can't help but love trying out new ones. There are always so many variations to try that it's never boring. I really love this hairstyle because it allows me to wear my hair down while still adding some interest to an everyday look. Doesn't this snake braid look so interesting?? Try it and let me know how it works for you!
1. Start with your hair parted to one side.
2. Take a small section from the top and braid it.
3. From the 3 strands of your braid, grab the middle one and pull up the outer two to the top.
4. It should start to create a "snake" look as you pull up.
5. Pin back and it's ready to wear!
xoxo erica

4.17.2014

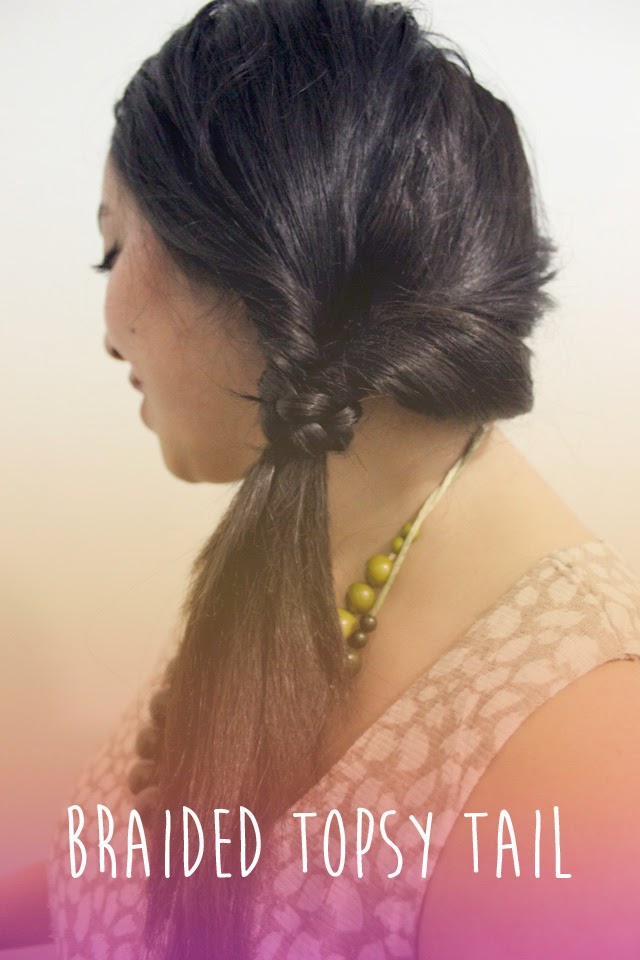
Hair Tutorial // Braided Topsy Tail

I"m a big fan of hairstyles that take up almost no time at all. I'm guilty of hitting the snooze button once or twice...okay maybe even three times so fast and easy are key to my morning routine. This style is ridiculously easy, super cute, and it looks like it takes more effort than really needed. 
1. Pull hair to one side. Grab about 1/3 of a section from underneath and rubber band the rest.
2. With the section that is rubber banded, separate hair into two sections right above the rubber band.
3. Pull your pony tail through the hole created by the separated sections.
You should now have a topsy tail.
4. Braid the remaining 1/3 section from earlier and rubber band.
5. Wrap braid around topsy tail.
6. Rubber band the braid to your topsy tail and remove the rubber band from when you braided the 1/3 section.
All done!! I just went with a regular braid but I think a fishtail braid wrapped around your topsy tail would look just as cute. Don't know how to do a fishtail?? Check out the tutorial here.
xoxo erica

10.29.2013

Mini Twist Buns Tutorial

Slowly I'm starting to find ways to style my hair even with it being short. I like the look of three mini buns because it looks like great even if gets a bit messy, which works for my layers. Oh and anything that is mini is just cute right? Have fun with this hairstyle by adding a braid to the front or using fun hair clips with it.
1. Part your hair.
2. Twist strand
3. Make a small bun with strand and bobby pin down.
Repeat for 2 more mini buns
4. Pull down a few hairs to frame face.
All done!
xoxo erica

9.25.2013

Curl Your Hair with a Straightener Tutorial

 I have naturally wavy/curly hair...the kind that is all wild and frizzy. I usually straighten my hair whenever I go out but with thin hair it can get to looking flat. Recently I've been stealing **borrowing** my niece's hair wand to curl my hair to add more bounce and body. The only problem is I don't have one at home so figured I would learn how to do it with my straightener since I don't feel like going to buy a wand or curling iron. Remember I'm saving for a wedding and when it comes down to spending a little bit on myself I'd rather go for new pair of shoes. Besides curling your hair with a straightener happens to be really easy.
 1. Pull up half of your hair and separate into 2 sections
2. Clamp a strand of hair in straightener, wrap around, and pull down to the end of your strand.
You've got a curl!
 Keep repeating these steps: Clamp, wrap, and pull
 3. Let down your top pieces of hair and do the steps for each side.
4. Spray a bit of hair spray...brush fingers through if you want softer curls.
 All done!
Wear your gorgeous curls out on a hot date or something like that!!

xoxo erica

p.s. don't forget to enter the giveaway!!

7.30.2013

Hair Bow Tutorial

I'm a girly girl so naturally when I learned how to do a hair bow, I was hooked. How can you not love a hairstyle this fun...oh and the best part is that it's so easy. I promise it takes almost no effort and you can fix this up within a minute. Perfect for those days when you have little time to do something with your hair and want to have a fun attitude for the day.
 Pull hair into a high ponytail.  Pull hair halfway through rubber band so you have a high bun at top and your ends to the front of your head.
Pull apart your bun. Pull back your ends over the center of your pulled apart bun. Use a bobby pin to secure everything.
Oh look, you've got a bow in your hair!!
xoxo erica

Braids more your style? Check out the mermaid braid here and the unicorn braid here.

7.19.2013

Mermaid Braid Tutorial

 Hey it's Friday!! I wanted to leave you all with a fun braid to try this weekend. I finally learned how to do a mermaid braid. I've always wanted to know how to do it simply because of it's name. In another life I would be a mermaid. Last summer I really got into braids and they are my go to hairstyle whenever I want to pull my hair back...especially while working out. I usually switch them up every now and then. The mermaid braid has been my favorite this summer.
Separate hair into 3 sections, 2 large strands and 1 small strand
Braid up the large sections. Make sure to rubber band each braid.
Open up the first loop of the braid, stick finger through and grab the small strand, pull through.
Cross over and repeat for other braid.
Repeat these steps until you complete the full braid.
It should look like this. 
Rubber band the full braid and remove the rubber bands from your initial separate braids.
 Loosen up the braid &
 it's ready to wear!
xoxo erica
Follow Sea of Blooming Dreams